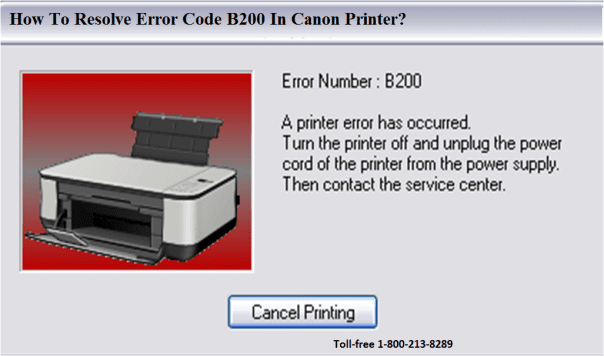
Error Code B200 CANON MP250

Every one have or use Canon inkjet printer, will have a chance to find Error Code B200 at some point of the printer. This error has bothered many printer user at anytime when this error is coming, because this problem is not predicteble before.
In the Error Code B200, Canon technicians recommends to users some generic fixes for this problem. This recomendation like turn OFF of the printer and turn ON it. But we found some more solution robust fixes that involve working with the printer heads.
Error B200 Causes :
Why the printer is error and What Sets Off this Printer Error?
Why the printer is error and What Sets Off this Printer Error?
Among of the causes:
The error on the printer occurred when a papers has been printed and the ink completely empty, in condition if a cartridge is completely empty.
According to Canon, it also be due to foreign cartridges, with which the printer can not cope. Cleaning and checking the printheads will help of this error. But you have to remember, it solution only if the printer is no longer guaranteed, as the warranty may be void, because you may damage the printhead.
Another of the causes:
The other cause of this error usually occurs when different formulas of ink have been utilized by the printer. This error some times occurs when you replace or refill an OEM cartridge with not legimate product and this product in generally with cheap price supplies that have questionable toner quality and/or build quality.
Troubleshooting Guide :
How to Fix the printer with Error B200?
How to Fix the printer with Error B200?
There are two phase to solve this error; hardware technical phase and software technical phase of the printer.
Phase 1: Hardware Technical Phase
In this phase, we have five solution for solve the printer error code B200. This solutions come from numerous times experience of printer technician after face same error by repeatedly.
Check out the fixes and solution of this problem, we will guides step-by-step for clearing this problem. Select one of the five available solutions below:
Solution 1:
- Turn OFF the printer.
- Unplug the printer from the power source.
- Open the printer cover then reveal the ink cartridges.
- Remove the printhead from the printer be carefully.
- Clean the Printhead along with the Ink Cartridges.
- Clean the contact pads in the printer with a contact cleaner or a good pencil eraser.
- Reinstall the printhead again.
- Reinstall the ink cartridges thereafter before powering up the printer.
- Run the “Auto Head Alignment” for testing the printer.
Solution 2:
- Turn OFF Power of the Printer.
- Open the print head bay (as though you were about to change inks).
- Turn ON power.
- Wait for print carriage to start moving to the left and let it go past half way.
- Before print carriage reaches left hand side (but after going halfway across) shut the cover.
- Turned on the Printer again.
Solution 3:
- Turn OFF the printer.
- Disconnect the printer from the power source.
- Get out the Ink Cartridges.
- Fold up the dark gray frame.
- Get out the Printhead.
- Rinse the Printhead well by warm water, for better results use Tylenol or alcohol.
- Wipe the Printhead with soft, absorbent paper.
- Blow off Printhead with the air.
- Let print head dry for 1/2 hour.
- Fold down the dark gray frame
- Install the Printhead.
- Get in the Ink Cartridges.
- Reconnect the printer to power source.
- Turn ON the printer again.
- Start printer.
Solution 4:
- Turn OFF the printer.
- Disconnect the printer from the power source.
- Open cover of the printer and remove the color cartridges.
- Remove the sled in which the cartridges were previously placed.
- clean the cartridges with water be carefully. For maximum results, clean it use isopropanol (there in the pharmacy), so that the printhead can not clog with lime.
- Make sure that the golden contacts are not wet, otherwise you can damage the print head.
- Dry everything be carefully, make sure no residual water gets into the printer.
- Reinstall cartridges and carriages in the first place.
- Turn ON the printer again.
If the message of "Error B200" appears again, the printer have to be switched off again. And The flap have to be opened before switching on. When switching ON again with the flip open, the printer then performs a self-test: Then the error should not occur to repeat more often, that it works and the problem solved.
Solution 5:
- Unplug the power cable.
- Open the printer.
- Push the whole print head mechanic to the center.
- While the printer still open, plug the power and turn it ON.
- When the printhead still moving and is going to the very LEFT, close the cover.
- Wait until its boot up.
If you have trying and following step by step of the first phase guide and the error still pops up in your printer, proceed to the second phase below.
Phase 2: Software Technical Phase
In this phase, you will need to have an internet connection and administrator access on a computer. For this phase, follow the step by step below:
- Update the printer drivers as well as the Canon IJ Printer Utility software.
- Click “Start” from your Windows desktop and click “Devices and Printers.”
- Right-click the Canon MPxxx (according your Canon code Version) and click “Properties.”
- Select the “Maintenance” tab and click “Deep Cleaning”.
- Run a Nozzle Check from the Maintenance tab when the deep cleaning is done.


No comments:
Post a Comment